Basics
In this section I am going to talk about all the basic stuff which is needed to be understood. It will give you an idea about why all of the different parts of the project are needed for what reason.
Different Kinds of Signals
To control every computer from one point, you’ll have to make sure that every kind of signal for controls, video and audio of each computer are converted to one kind of signal for each of its kind. In my project, I differentiate between and use the following kinds of signals in their historical order:
- Video
- TTL (Transistor–transistor logic)
- VGA (Video Graphics Array)
- DVI-D (Digital Visual Interface - Digital)
- HDMI (High Definition Multimedia Interface)
- (DisplayPort)
- Audio
- Keyboard
- Mouse
- Game Controls
As you can see, a lot of diffent kinds of signals are involved. Some are simply a subset of others which do not need to be converted, other signals need a more or less complex conversion. I will not go into details at this point, please refer to the Wikipedia articles I linked if you want to know more about each kind of interface.
The following picture shows the signal types which are involved:
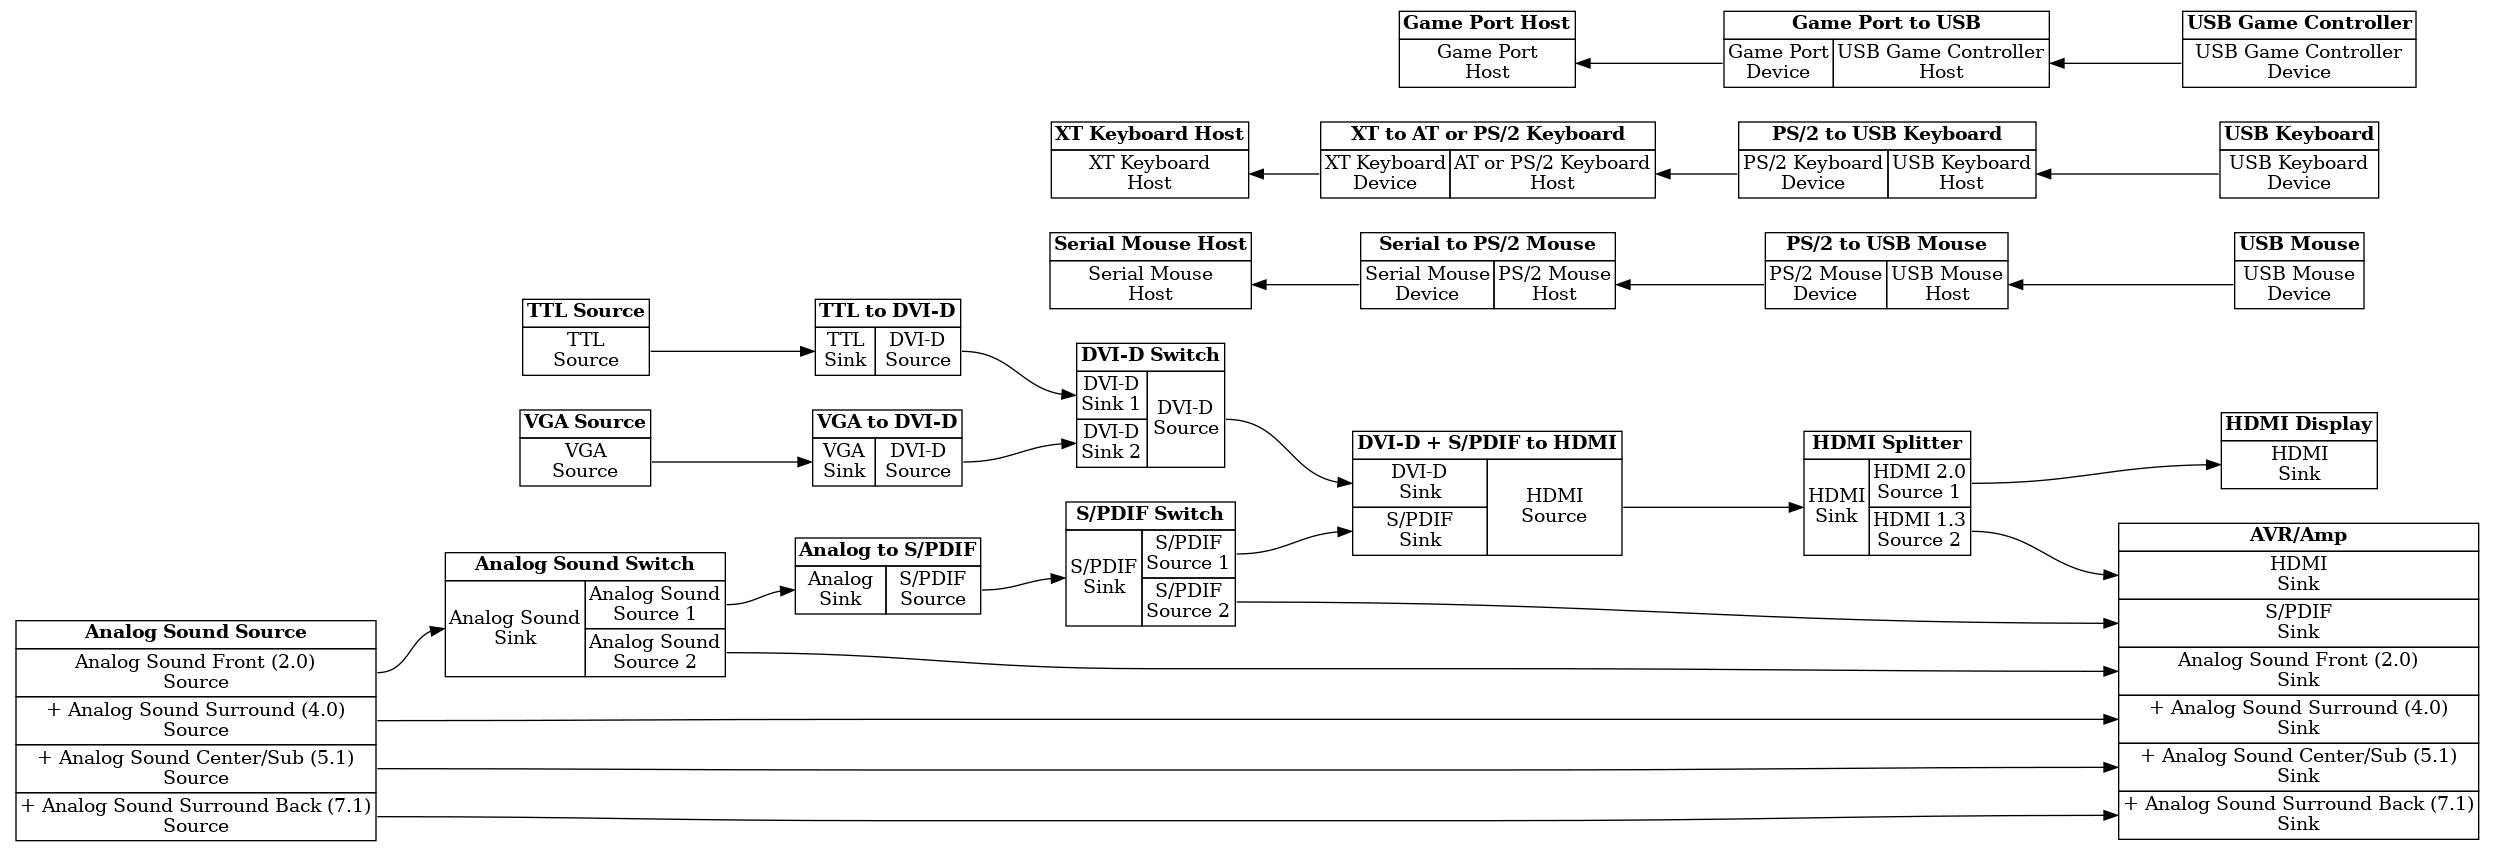
Basic Signal Flow
The arrows show the direction in which the signals and/or the data is flowing. Note that some connection types are actually bidirectional, but I am using unidirectional arrows to simplify the picture and to avoid confusion.
Video Signals
Here I will show you the different video singals used.
TTL
TTL stands for Transistor–transistor logic and represents the first video signal generations of the PC world. This involved the monochrome standards MDA (text only) and Hercules, and the color standards CGA (4 colors) and EGA (64 colors). They use one signal line per Bit along with horizontal and vertical sync signals with TTL level to transfer the display image digitally.
VGA
At the moment, the only kind of analog video signals I am using is VGA. This means that the color signals are analog, with different voltage levels representing different brightness levels of the three basic colors red, green and blue (RGB).
DVI-D
VGA signals can be converted to DVI-D (Digital Visual Interface - Digital) with an ADC (Analog-to-Digital Converter). Note that VGA signals can also be converted directly to HDMI, but this would also include audio at the same time to be converted. I will explain later why I do not choose this method.
HDMI
DVI-D is upwards compatible to HDMI, which means an HDMI sink should understand DVI-D signals. To make it simple, HDMI is basically DVI-D with an added digital audio stream. In contrast to DVI-D, HDMI only uses one “link” but with a higher possible bandwidth, while DVI-D can use one link or two links, named Single-Link and Dual-Link. There was an HDMI Dual-Link version, but it never hit the market. So conversion from DVI-D to HDMI is simple with Single-Link signals for resolutions up to 1920x1200@60 Hz RGB. It would also be possible to convert DVI-D Dual-Link to HDMI, but it is extremely hard to find a converter which is able to do this. There exists one, the Thruput VideoMax III, but it is not available at the moment. Using this device would also force me to sacrifice some flexibility, which led me to the decision to stick to DVI-D Single Link.
Audio Signals
At this point I will show you the different audio signals used. The X.Y notation shows the amount of speakers used, while X stands for “normal” speakers and Y for the amount of subwoofers or LFEs (“Low-Frequency Effects”).
Analog Stereo (2.0/2.1)
The analog stereo signal consists of two analog channels, one for the left speaker, and one for the right speaker. Most devices support this, even older ones. Even though it contains only two channels, it is often called 2.1 because you can extract the subwoofer or LFE signal from it using a frequency seperating filter.
Analog 4.0
Analog 4.0 signals are basically like stereo, but with an added rear stereo signal pair, ending up with four channels.
Analog 5.1
To get 5.1 signals, a center channel for one speaker standing in front direction, and a discrete subwoofer or LFE channel is added.
Analog 7.1
7.1 is nearly like 5.1, but another stereo pair for rear speakers is added.
S/PDIF
The S/PDIF interface is the first popular digital sound interface used. It supports 44.1 and 48 kHz sampling rates with up to 24 bits sampling depth. This limits the bandwidth, so 5.1 and 7.1 signals can only be transmitted in a compressed format. Analog stereo signals can be converted to S/PDIF easily by using an ADC. This uses a fixed sampling rate which must be chosen with the product, I went for 48 kHz. There may be products which allow different sampling rates, but I did not find this useful. It would also be possible to convert analog 5.1 and 7.1 signals to S/PDIF in theory. In reality it is difficult to do this, because it would introduce an additional delay to the signal due to compression and uncompression overhead. I have not seen a product which does this in the wild, if you did, let me know!
HDMI
In addition to video signals, HDMI also supports all formats S/PDIF uses, and introduces some new formats. Most important for me are the uncompressed 5.1 and 7.1 formats, which provide the best quality for the AVR (Audio/Video receiver) I am using. To bring together both the DVI-D video and S/PDIF audio stream, some kind of a multiplexer is needed. Using a multiplexer which multiplexes VGA with analog sound to HDMI is not needed, because I have seperate ADCs for VGA to DVI-D and analog stereo to S/PDIF, which offers greater flexibility and routing options. To generate HDMI signals from audio and video signals, I use a multiplexer which multiplexes S/PDIF with DVI-D to HDMI.
Output Consoles or Signal Sinks
So as we know all the types of signal sources used, it is important to know which different signal “sinks” are being used. A signal sink is the “target” of a signal source. This is easy to understand for unidirectional signals like analog sound, but becomes more difficult for bidirectional signals, which communicate both ways.
In my project I am using three different types of consoles, while each one can be taken as a collection of sinks and sources:
Console 1: The Desk Console
The most important and most frequently used console for my project is the “Desk Console”. By this I mean the set of devices usually used at a normal (nerd) desk. This is how my desk console is equipped:
- Video
- HDMI 2.0 18 Gbit/s (and DisplayPort 1.2) compatible UHD display (ASUS MG28UQ), capable of 3840x2180@60 Hz RGB and digital stereo sound over HDMI
- Audio
- HDMI 1.2a compatible AVR (Yamaha RX-V861) with analog 2.0/5.1/7.1 and digital S/PDIF and TOSLINK inputs
- Headphones
- Keyboard
- USB Keyboard (Microsoft Natural Ergonomic Keyboard 4000 v1.0)
- Mouse
- USB Mouse (Logitech RX 250)
- Game Controller
- USB Game Controller (Microsoft Xbox 360™ Controller, wired version)
Console 2: The Living Room Console
To be able to control my computers sitting on the couch, I am using a console which I call the “Living Room Console”. This console is equipped like the following:
- Video
- HDMI 2.0 18 Gbit/s compatible UHD TV (Sony KD-55X8509C), capable of 3840x2180@30 Hz RGB and digital stereo sound over HDMI
- Audio
- Stereo Amp, connected to the TV’s headphone output (eww…)
- Keyboard
- USB Keyboard
- Mouse
- USB Mouse
- Game Controller
- USB Game Controller (Microsoft Xbox 360™ Controller, wired version)
Console 3: The Network Console
To control my computers from anywhere in the world, I invented a more or less virtual console which I call the “Network Console”. This console must be a computer equipped with some kind of display, keyboard, mouse, audio and a HTML5 or Java compatible Internet Browser. This console could be equipped like the following:
- Video
- Some display the computer uses, e. g. 1920x1080@60 Hz RGB (up to 3840x2160@60 Hz 4:2:0 YCbCr is possible)
- Audio
- Stereo
- Keyboard
- Some kind of Keyboard
- Mouse
- Some kind of Mouse
- Game Controller
- None (too complicated, maybe I will find a networked solution for this in the future)
Breaking it down to the most frequent signal types
So as we saw in the section before, we have different consoles with different features, but they have the most features in common. This is what they are all capable of:
- HDMI Video
- HDMI Sound
- USB Keyboard
- USB Mouse
Two consoles allow additional features:
- Console 1: The Desk Console
- USB Game Controller
- 4.0/5.1/7.1 Analog Sound
- Console 2: The Living Room Console
- USB Game Controller
The basic idea must be to convert everything to the features all consoles support, with some additional features only available for the two more or less local consoles. Also some features could be preferred over others depending on the case. As an example, if I want to use a computer with analog stereo sound at my Desk Console, I prefer the analog signal being handed to the AVR directly instead of converting it to a digital singal first, because I expect a higher quality at the output.
Pitfalls
There are some special cases when dealing with the different types of signals which need a special treatment.
Different HDMI Versions at the Same Time
As you might have already noticed, I am using an HDMI 2.0 display and an HDMI 1.2a AVR at the same time. If I would connect the display to the HDMI out of the AVR, and the HDMI source to one of the AVR’s inputs, I would be limited to HDMI 1.2a, resulting in only 1920x1080@60 Hz RGB maximum video resolution. In addition, I would have to switch on the AVR all the time, even if I do not want to use it. If I connected my HDMI source to the display only, I would not be able to use the HDMI audio on my AVR. I could buy an HDMI 2.0 capable AVR, but those newer models do not support analog 5.1/7.1 sound anymore. So how could I solve this problem?
My first attempt was to use a simple HDMI splitter, which sends the signal connected to the input to both of its outputs. The problem is that the signal still might be a HDMI 2.0 signal, which the AVR does not accept.
After further research I found a device which is similar to an HDMI splitter, but works a bit different. It has two outputs: The first one just passes through what comes from the input and is HDMI 2.0 compatible. The second output is special: It sends the sound stream of the input together with a black picture at 1920x1080@60 Hz RGB. To make sure the HDMI source sends the right video and audio signal types, it mixes the EDID of both the outputs, generating a new EDID with the video features of the display and the audio features of the AVR. This EDID is then presented the HDMI source. When the HDMI source now sends 3840x2180@30 Hz RGB with 7.1 uncompressed audio for example, the display will show the picture accordingly while discarding the audio signals it does not support. The AVR will output 7.1 sound together with a black picture, which will not be seen anyhow. The device I am using for this purpose is the Feintech VAX01201.
Converting PS/2 Mouse and Keyboard to USB
If you want to connect a PS/2 mouse and keyboard to a computer with a USB port, there are dozens of adapters available to achieve this. In my project I want to do this exactly the other way round. There might be adapters to do this, but the easiest way is to simply use KVM switches which support PS/2 (and mostly USB) on the CPU side and USB support on the console side.
Converting Game Port Game Controllers to USB
Just like above, there are dozens of adapters to connect game port game controllers to a USB port, but I would like to do it the other way round. I could not find any adapter which does this, so I will build one on my own in a seperate project. This adapter should be able to either convert one game controller with two two-axis controllers and four buttons, or two controllers with a two-axis controller and two buttons each.